Business Settings
This section allows you to configure key organizational settings. You can set up payout settings, define salary structures, add and manage organization units, configure notification preferences, and set up the organization chart. Additionally, you can manage approval workflows, set unit-level parameters, and handle user management to ensure proper access and roles within the system.
- Company Details
- Payout Date
- Salary Structure
- Compliance Details
- Organization Unit
- Unit Parameter Settings List
- Approval Workflow
- User Management
Company Details
 This section captures the basic information related to your organisation, including the employer name, employer type, registered phone number, email ID, registered GST address, payout date, billing address, and the company logo. These details are generally pre-filled by our sales representative during the initial setup process.
Payout Date
 In this section, you can configure your organization’s payout settings. Choose how monthly salaries should be calculated - either based on the actual number of days in the month or by specifying the organization’s standard working days. You can also decide when salaries should be paid, selecting either the last working day of the month or a specific day of your choice. Additionally, you can also see when your first payroll will start and the payout date for it
Salary Structure
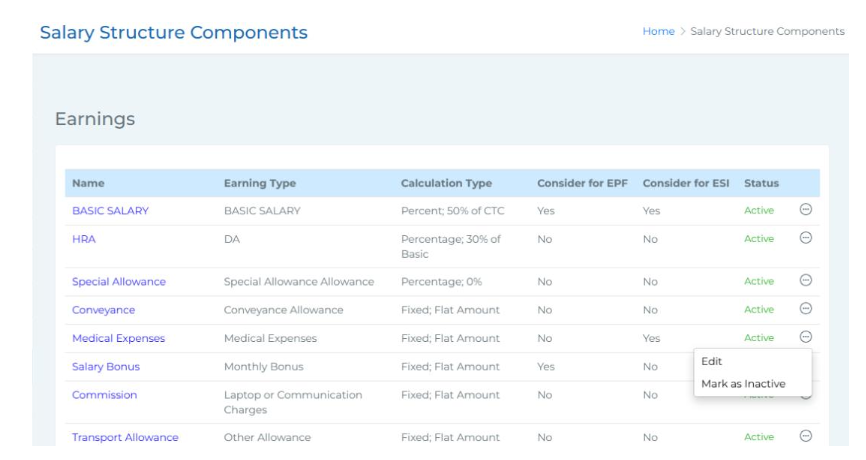 In this section, you can view and manage the different components of the salary structure. The list shows details like the name of the earning, its type, its calculation type, and whether it's considered for EPF and ESI. It also shows the current status - active or inactive. To make changes, click on the three-dot icon beside the status column. A pop-up will appear where you can update the calculation type and change its status as active or inactive, based on your organisation’s requirements. However, some core components like Basic Salary, HRA, and Special Allowance cannot be marked inactive.
Compliance Details
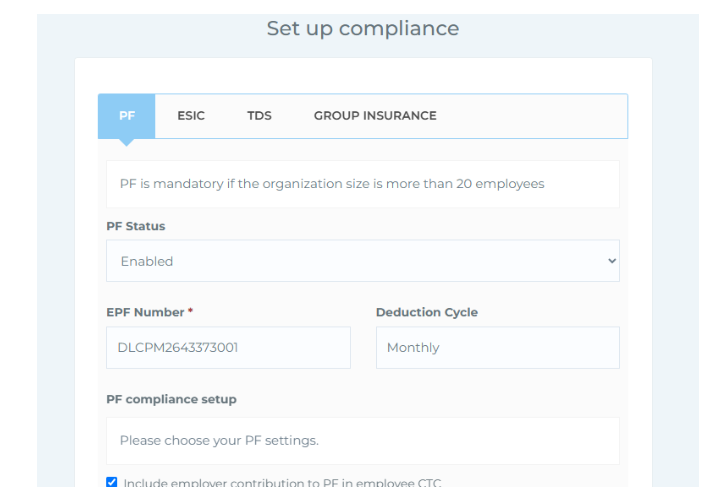 This section helps you configure statutory settings related to PF, ESIC, TDS, and Group Insurance as per your organization's policies. Please note, filling out this section is optional and not mandatory for using the platform. It includes the following four menus:
● PF (Provident Fund) - You can enable or disable PF, enter the EPF number, and view the monthly deduction cycle. You’ll also find checkbox options to set up your PF compliance as per your policies, such as including employer contribution in CTC, using only basic salary for PF calculation, or applying the PF limit of ₹15,000. Standard employee and employer contribution .
● ESIC (Employee State Insurance) - Here, you can enable or disable ESIC, enter the ESI number, and view the deduction cycle (monthly). Standard contribution rates for employees and employers are shown. Click Save to apply changes.
● TDS (Tax Deducted at Source) - You can activate or deactivate TDS payment settings. After configuring, click Save to confirm.
● Group Insurance - This section allows you to enable or disable group insurance based on your organization’s policy. Click Save once the settings are finalised. These settings are available for organizations that wish to manage their compliance requirements directly within the system.
Organization Unit
 In this section, you can view all your organizational units and create employee groups as needed. There is a search filter available to search by organization unit name. The list shows existing organisation units with key details like the unit name, employee count, whether it's attendance- only (via checkbox), state, pin code, and current status (active or inactive).
In the Action column, you can edit unit details, map employees under the Create Employee Group column and then use the print icon to update settings. To add a new organization unit, click the Add Organisation Unit button at the top right. A pop-up will appear where you can enter details such as the unit name, address, state, and pin code. Once saved, the new unit will appear in the list along with the existing ones.
Unit Parameter Settings List
 This section displays a list of multiple units within your company. A search bar is available to help you quickly find units by name.
The list includes key details such as Company Name, Address, Contractor EPF Number, Contractor ESI Number, Department Count, and Designation Count. An Action column provides an edit icon - clicking on it redirects you to the Company Details, Departments, and Designation pages where you can update relevant information
Approval Workflow
 In this section, you can set up and manage the approval process within your organization.
You’ll find a filter that allows you to search templates either by employee or by approver. The list below shows all existing approval templates with details such as template name, department, designation, mode (strict or flexible), module, number of reporting levels, number of mapped employees, status, and an action column. If a template is not verified yet, you’ll see an edit icon to update it. If it’s already verified, an eye icon will appear so you can only view the template details. You’ll also see a delete icon to remove templates if needed.
To create a new approval workflow, click on the Add Approval button in the top right corner. A pop-up will appear where you can enter the basic details including template name, department, designation, module, mode, and select the employees you want to map from the dropdown. Below that, there’s a Configure button - clicking this will open the section to add approvers. To define the approval hierarchy, click on Add Approver Level. Two dropdowns will appear: in the first one, you can choose whether the approver is based on a role or an individual employee.
In the second dropdown, you can then select the specific role or employee. You can repeat this step to add multiple levels of approvers as required. Once everything is configured and saved, the template will be listed among other existing approval workflows.
User Management
 In this section, you can view and manage users within your organization. You also have the flexibility to add new users, define roles, create departments, and assign projects as per your organizational needs. Under User Management there are four sections:
- User - This section allows you to manage users and their access within the system. The list displays user details such as name, assigned role, organisation unit, number of employees under them, status (Pending or Verified), and an action column where you can edit user information. If a user is marked as inactive, they will no longer appear in the active list. To add a new user, simply click on the Add User button. You can enter the user's full name and mobile number manually, or use the Search Employees option to autofill details like employee name and contact information. After that, you can add an email ID, assign a role, and select one or multiple organisation units from the dropdown. Once saved, the user will be added to the system.
-
Roles - Under this section, you can view and manage different user roles within the
organization. Each role is listed with its name, description, and an action column with an
Edit option.
By clicking on Edit, you can define the level of access the role should have for various
modules. You can choose to allow Full Access, View Access, Create Access, or Edit
Access for modules such as Employees, Attendance Management, Payouts, Approvals,
Reports, Business Settings, Onboarding Assistant, Help & Support, Visitor Management,
Leave Management, Broadcast, Dashboard, Employee Management, Settings, Recruit,
Training & Development (T & D), and PMS. This helps ensure that the right level of
control and responsibility is assigned to each role.
-
Department - This section allows you to manage organizational departments and their
associated designations. It displays a list that includes the Department Name, Designation
Count, Employee Count, and an Action column with an Edit icon.
By clicking the Edit icon, you can update the department name and assign one or multiple
employees to that department. Once you make the necessary changes and click on the
Update Department, the updates will be saved.
You also have the option to add new designations to a department by clicking on the Add
Designation icon.
If needed, you can assign a single designation to multiple departments by enabling the
checkbox labeled Add designation to multiple departments.To add a new department,
simply click on the Add Department button, enter the department name, and it will be added
to the list of existing departments.